Learn to inspect and verify certificates in a Kubernetes cluster, covering both manual setups and automated configurations like kubeadm.
Hello, and welcome to this lesson. In this guide, you will learn how to inspect and verify certificates in an existing Kubernetes cluster. Imagine joining a new team responsible for a Kubernetes environment where you need to perform a health check on cluster certificates due to reported issues. This lesson covers both manually set-up clusters and those configured using automated tools like kubeadm.
Before diving into certificate verification, it’s important to understand your cluster’s setup. There are several methods for deploying a Kubernetes cluster, and each has its own approach to generating and managing certificates.
If you deploy a cluster from scratch, you may generate and configure all certificates manually (as explored in a previous lesson).
If you use an automated provisioning tool like kubeadm, certificate generation and configuration are handled for you. In this case, Kubernetes components are deployed as pods instead of OS services.
When Kubernetes components are deployed as native services, you can review service files to understand the certificate configuration. For example, inspect the kube-apiserver service file:
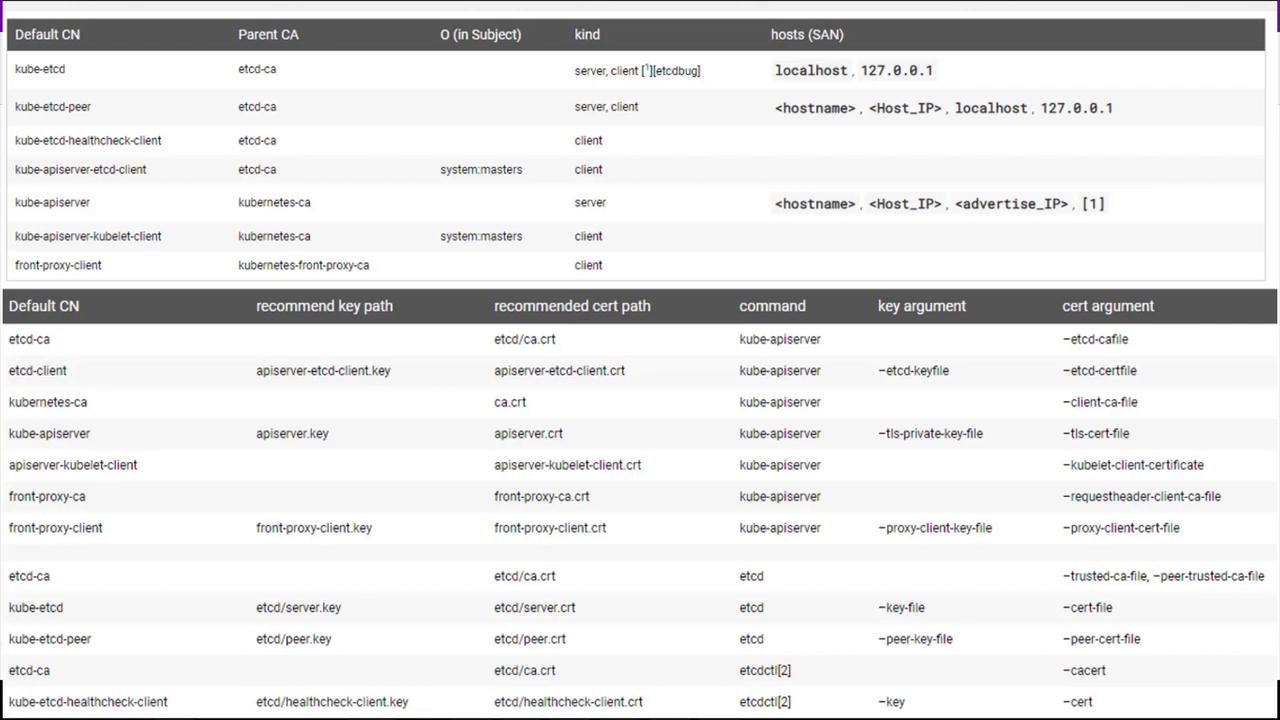
When performing a certificate health check, it’s essential to create a checklist—perhaps using a spreadsheet—to record details such as:
Certificate file paths
Configured names and alternate names
Associated organizations
Certificate owners
Certificate authorities (issuers)
Expiration dates
Begin by examining configuration files (such as the kube-apiserver manifest located in /etc/kubernetes/manifests) to identify the certificate files in use.For example, the kube-apiserver manifest might reveal the following options:
Repeat this process for all certificates in your Kubernetes cluster. Ensure that:
Certificate names and alternate names are correctly configured.
Each certificate is associated with the appropriate organization.
Certificates are issued by the correct certificate authority (e.g., kubeadm typically uses “Kubernetes” as the CA).
None of the certificates have expired.
An expired or misconfigured certificate can cause critical disruptions in your cluster’s operations. Always validate certificate expiry dates and issuer details.
Check service logs using system commands. For example, inspect etcd logs with:
Copy
Ask AI
journalctl -u etcd.service -l
Below is an example excerpt from etcd logs:
Copy
Ask AI
2019-02-13 02:53:28.144631 I | etcdmain: etcd Version: 3.2.182019-02-13 02:53:28.144680 I | etcdmain: Git SHA: eddf599c62019-02-13 02:53:28.144684 I | etcdmain: Go Version: go1.8.72019-02-13 02:53:28.144692 I | etcdmain: Go OS/Arch: linux/amd642019-02-13 02:53:28.144696 I | etcdmain: setting maximum number of CPUs to 4, total number of available CPUs is 42019-02-13 02:53:28.144734 N | etcdmain: the server is already initialized as member before, starting as etcd member...2019-02-13 02:53:28.146651 I | etcdserver: name = master...WARNING: 2019/02/13 02:53:30 Failed to serve client requests on 127.0.0.1:2379Failed to dial 127.0.0.1:2379: connection error: desc = "transport: authentication handshake failed: remote error: tls: bad certificate"; please retry.
For further details on certificate requirements and best practices, please refer to the official Kubernetes Documentation and explore additional resources available on the Kubernetes website.That’s it for this lesson. Head over to your practice environment and gain hands-on experience in viewing and verifying certificates in an existing Kubernetes cluster.