Extend your GitHub Actions CI/CD pipeline to securely generate a MongoDB secret and deploy your Kubernetes manifests into a development namespace. This ensures automated, secure credential management and consistent application delivery.
1. Configuring the Dev-Deploy Job Under jobs: in your workflow YAML, add a dev-deploy job that:
Replaces placeholders in your manifest files
Creates a Kubernetes secret for MongoDB credentials
Applies all manifests to your development namespace
name : Solar System Workflow on : workflow_dispatch : push : branches : - main - 'feature/*' env : MONGO_URI : 'mongodb+srv://supercluster.d83jj.mongodb.net/superData' MONGO_USERNAME : ${{ vars.MONGO_USERNAME }} MONGO_PASSWORD : ${{ secrets.MONGO_PASSWORD }} jobs : unit-testing : … code-coverage : … docker : … dev-deploy : name : Deploy to Dev Env runs-on : ubuntu-latest steps : - name : Checkout repository uses : actions/checkout@v3 - name : Replace tokens in manifests uses : cschlieden/replace-tokens@v1 with : tokenPrefix : '_{' tokenSuffix : '}' files : - kubernetes/development/*.yaml env : NAMESPACE : ${{ vars.NAMESPACE }} REPLICAS : ${{ vars.REPLICAS }} IMAGE : ${{ vars.DOCKERHUB_USERNAME }}/solar-system:${{ github.sha }} INGRESS_IP : ${{ env.INGRESS_IP }} - name : Show processed manifests run : cat kubernetes/development/*.yaml - name : Create MongoDB secret run : | kubectl -n ${{ vars.NAMESPACE }} create secret generic mongo-db-creds \ --from-literal=MONGO_URI=${{ env.MONGO_URI }} \ --from-literal=MONGO_USERNAME=${{ env.MONGO_USERNAME }} \ --from-literal=MONGO_PASSWORD=${{ secrets.MONGO_PASSWORD }} \ --save-config \ --dry-run=client \ -o yaml | kubectl apply -f - - name : Deploy manifests run : kubectl apply -f kubernetes/development
Ensure that vars.NAMESPACE, vars.REPLICAS, and your Docker Hub credentials are configured in your GitHub repository settings.
Workflow Steps at a Glance Step Action Description Checkout actions/checkout@v3Clones your repository Token Replacement replace-tokens@v1Injects variables into Kubernetes YAML files Secret Creation kubectl create secretGenerates or updates mongo-db-creds in namespace Deployment kubectl applyApplies all manifests in kubernetes/development
2. Kubernetes Deployment Manifest In kubernetes/development/deployment.yaml, reference the mongo-db-creds secret to populate environment variables for your container:
apiVersion : apps/v1 kind : Deployment metadata : name : solar-system namespace : _{NAMESPACE} labels : app : solar-system spec : replicas : _{REPLICAS} selector : matchLabels : app : solar-system template : metadata : labels : app : solar-system spec : containers : - name : solar-system image : _{IMAGE} imagePullPolicy : Always ports : - containerPort : 3000 name : http protocol : TCP envFrom : - secretRef : name : mongo-db-creds
For more on Kubernetes secrets, see Kubernetes Secrets .
3. Why Use a Secret? Your Dockerfile includes placeholder environment variables:
FROM node:18-alpine3.17 WORKDIR /usr/app COPY package.json /usr/app/ RUN npm install COPY . . ENV MONGODB_URI=uriPlaceholder ENV MONGO_USERNAME=usernamePlaceholder ENV MONGO_PASSWORD=passwordPlaceholder EXPOSE 3000 CMD [ "npm" , "start" ]
By leveraging a Kubernetes secret:
You avoid hard-coding sensitive data
Credentials are injected at runtime
Configuration is decoupled from your application image
Never commit real credentials into source control. Use GitHub Secrets and Kubernetes Secrets to manage sensitive data.
4. Verify a Fresh development Namespace Before deployment, confirm that the namespace is empty:
kubectl -n development get all kubectl -n development get secrets # NAME TYPE DATA AGE # default-token-xxxxx kubernetes.io/service-account-token 3 47h
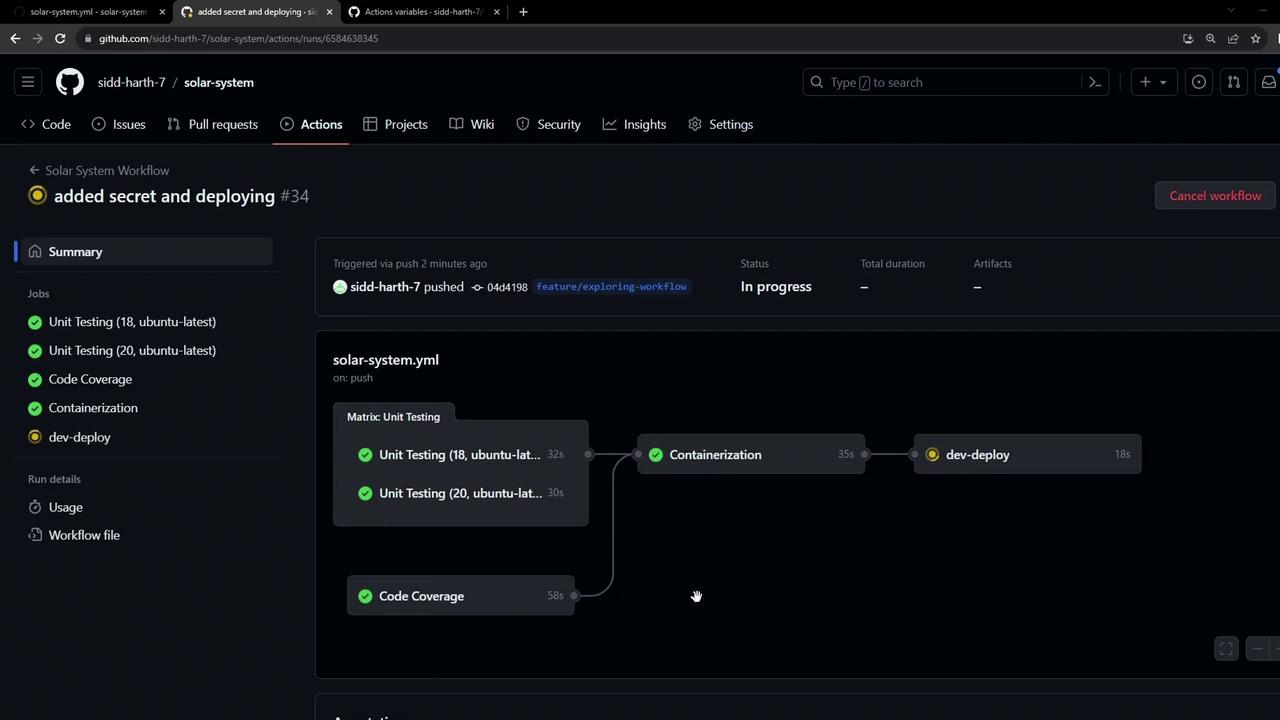
5. Watching GitHub Actions in Motion When you push changes, the dev-deploy job runs alongside other CI tasks:
5.1 Secret Creation Logs kubectl -n development create secret generic mongo-db-creds \ --from-literal=MONGO_URI=... \ --from-literal=MONGO_USERNAME=... \ --from-literal=MONGO_PASSWORD=... # Output: secret/mongo-db-creds created
5.2 Applying Manifests kubectl apply -f kubernetes/development # Output: deployment.apps/solar-system created ingress.networking.k8s.io/solar-system created service/solar-system created
6. Validate Resources in the Cluster Check that your secret and resources are live:
kubectl -n development get secrets # NAME TYPE DATA AGE # default-token-xxxxx kubernetes.io/service-account-token 3 47h kubectl -n development get all # NAME READY STATUS RESTARTS AGE # pod/solar-system-xxxxx 1/1 Running 0 30s # NAME TYPE CLUSTER-IP EXTERNAL-IP PORT(S) AGE # NAME READY UP-TO-DATE AVAILABLE AGE # NAME DESIRED CURRENT READY AGE # replicaset.apps/solar-system-xxxxx 2 2 2 1m
Retrieve your ingress host:
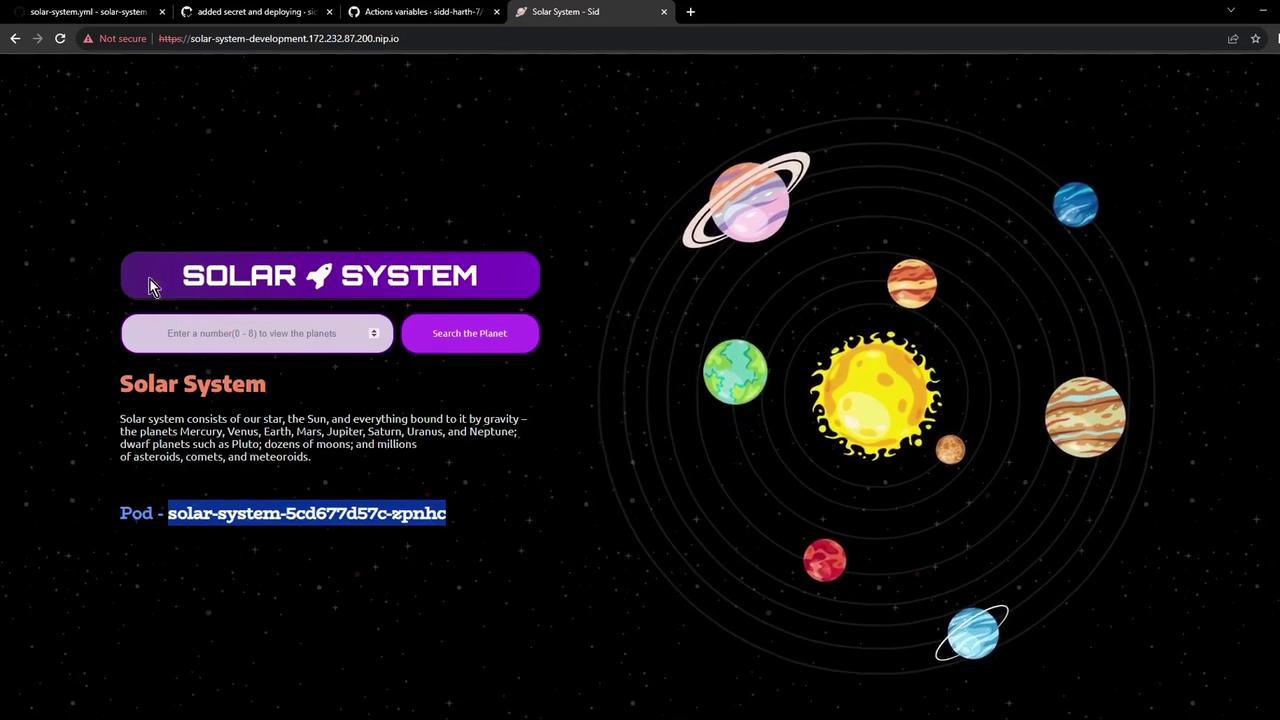
kubectl -n development get ing # NAME HOSTS ADDRESS PORTS AGE # solar-system solar-system-development.172.232.87.200.nip.io <none> 80 1m
7. Access the Application Open the ingress hostname in your browser. You may see a self-signed TLS warning—proceed to view your live Solar System app:
Your Solar System application is now running in the development environment, ready for integration testing!
References